Before you take to the skies it’s important you learn some simple drone manoeuvres to enhance your drone flying experience.
Here at COPTRZ, as one of the leading drone training NQE’s in the UK, we have compiled some of the best manoeuvres, and created a simple guide to help you to develop your skills.
1. The Lazy 8

Place the drone over the central cone with the rotors at eye level. Turn your drone just past 90 degrees and push off to the left or the right towards the six o’clock position. When your drone is in the area of either the left or right cone, add some rudder input to turn the drone 180 degrees and start heading back to the central cone.
This is a simple movement that will help you to gain a basic understanding of rudder movement. So it’s important you spend a little time on the lazy 8 to ensure you get the movement running smoothly.
2. Figure of 8

The Figure of 8 movement is very similar to the Lazy 8, but you will now use the rudder with a great deal more effect.
The easiest way to think of it is as two clockfaces with a cone in the middle. These clock faces are both the same size, on one side 3’oclock is adjacent to the central cone, and on the other side, 9 o’clock is adjacent to the other side.
So, start as you would with the lazy 8 movement. Just past the 90-degree point push off and head over to the 6’oclock position, once there add the rudder input and hold all that input all the way around the clock whilst pushing forwards at all time.
Once you reach the 3 o’clock point the drone will be facing you, however, don’t panic! Gently put in the opposite input on the rudder and start the movement on the other side. A good technique is to call out the numbers on the clock face as you go round, just to ensure you’ve got the movement as smooth as possible.
3. The Clock Face

The start point for the Clock Face is over the centre cone, this point will now be known as the 6 o’clock position.
Turn your drone through 90 degrees to either the left or the right. At this stage, you can either travel in a clockwise or anti-clockwise direction. It’s important to remember to try both directions.
Push the drone forward and place some rudder input, then head over to the 9 or 3 o’clock position. Turn the drone away from you as soon as you start, that way the 12 o’clock position will be 15 metres ahead of you. It’s important you watch your speed and heigh throughout, and ensure a smoother operation.
4. The Top Hat

The Top Hat manoeuvre to start with can be carried out in the tail-in orientation. Once you are happy that you’re hitting all the points of the Top Hat then try flying through the manoeuvre.
The start point is over to the left or to the right. Start with the rotors at eye level and position the drone on the flight line and move off towards the centre cone.
When you reach the 5-metre cone, stop, hold, and then rise 5-metres, again, stop, hold, and move off along the centre line, through the centre to the next 5-metre cone. Again, stop, hold, and then drop 5-metres over the 5-metre cone. Stop again and push on to the 10-metre cone. Once you reach the end, turn 180-degrees and start again reversing the process.
The trick is to watch your speed, slow and steady movements win the race. Stick to walking pace, and keep on the flight line.
5. 45-Degree Ascent and Descent
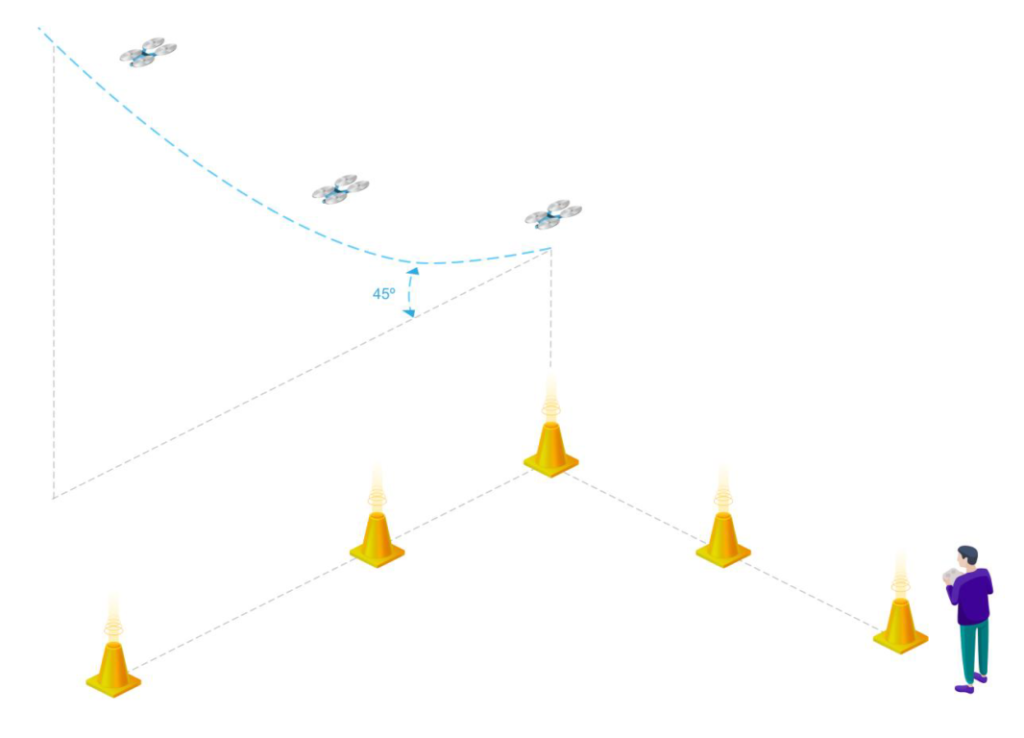
This is the manoeuvre that is normally used by helicopter pilots when launching from the airfield, but it also makes a great reveal shot when shooting video from a drone.
Again, this is a simple point A to point B flying movement. Use the centre cone as your start point (point A) and turn 90 degrees to either the left or the right, and push the drone forward and up to gain a 45-degree climb. Keep pushing up to around 30-metres (100 ft) and stop (point B).
Turn 180-degrees away from you and stop, then check your position and descend back down to point A. Push the right stick forward, and lower the drone with the left stick at the same time.
The trick with this movement is to keep your stick input linear. A tip is to use a pen/pencil: hold it out in front of you against the skyline at 45 degrees so you can see the line you need to fly, you’ll be surprised how steep it is!
6. The Safe Setup

Once you are more experienced and preparing for your Practical Flight Assessment as part of your PfCO training, you may like to adopt the Safe Setup Approach.
Under the Safe Setup, the take-off and landing point need to be marked out on the ground by a 10m square area marked off with 4 cones. A fifth cone could also be used to indicate North. This will also help as a reference if a Fly Away occurs. In most cases, the square becomes a diamond with one of the four cones being coloured differently to indicate it is the North cone.
This setup helps you to orientate yourself with the surroundings and gives you easy reference points.
Another good reason for this 10-metre box is in the event of a Return to Home being indicated. The drone will land inside this box, it’s an area that is easy to control.
Read more in our Drone Flying Guide.
Interested in signing up for one of our CAA/PfCO training courses? Feel free to fill out this form to enquire.
Download Our FREE RPC-L1 Guide
Understand everything you need to know about moving towards commercial drone operations with our RPC-L1 guide.
- Understand what RPC-L1 is and who it is for
- Learn how the CAA transition impacts operators and training routes
- Get a clear breakdown of requirements, costs and next steps
Related Posts

Drone Light Show: Swarmtech Drones LTD
Producing A Drone Light Show: How Does it Work? Welcome back to the Coptrz blog. This week, we are bringing you the behind the scenes on producing a drone light show. What goes into it? What drones are used? How does it work? Look no further than this blog! A drone light show is performed […]

COPTRZ News: Greenpeace drone stunt highlights need for drone detection at critical facilities
Greenpeace have posted footage on their Facebook page of them flying a drone into a French nuclear facility. The group have claimed the stunt was performed to highlight security issues around the facility. The facility was reportedly “at no time worried about the drone or attempted to intercept it”. It was crashed into the tower […]
Enterprise Solutions: DJI Matrice 200 Series Comparison
There has been a tremendous response from commercial drone users ever since COPTRZ unveiled the first DJI Matrice 200 in the UK back in May 2017. The industry has been crying out for a rugged, industrial grade aircraft and DJI have responded brilliantly with the release of the M200 Series. There are three aircraft in the series; […]